Building a Kubernetes Cluster on Raspberry Pi 5: A Complete Guide
There is no better way to learn than by doing! As such, I decided to build my own Kubernetes cluster on Raspberry Pi 5 over the holidays to see if I could run my previous chatbot project on it. I probably should have done this long ago, but I finally found the time after completing (sort of) my chatbot project. Below is the complete guide I used to set up a Kubernetes cluster on Raspberry Pi 5, including lessons learned along the way.
My Setup
I built my cluster using Raspberry Pi 5 (8GB) nodes with NVMe SSDs (512GB) via the M.2 HAT+ for optimal performance. The hardware also includes Waveshare PoE HAT (G) for Power over Ethernet and active cooling, connected through a TP-Link 5 Port Gigabit PoE Switch. While you can start with microSD cards, the NVMe storage upgrade is crucial—the I/O performance difference is essential when running container workloads.
Each server has the following hardware, in this order:
- Class 10 - MicroSD Card - 32 GB - BLANK, for the first setup and removed afterwards.
- Raspberry Pi 5 (8GB), including the Active Cooler.
- Waveshare 27670 - Power Over Ethernet HAT (G), enabling the server to leverage Power over Ethernet.
- Raspberry Pi 5 Hat+ Kit, including NVMe SSD (512GB), for NVMe storage.
- TP-Link 5 Port Gigabit PoE Switch, for Power over Ethernet to each server.
I also used the following items to complete the setup, though they're not critical:
- GeeekPi 4 Layers Cluster Case for Raspberry Pi 5, for a proper stacking order and cooling effect.
- Cable Matters 10Gbps 5-Pack Snagless Short Cat 6 Ethernet Cable 1 ft, to ensure the smallest cable possible.
- Male to Female Standoffs for Raspberry Pi (4-Pack), since the case didn't have enough space for the combined PoE Hat and M.2 HAT+
The end result:
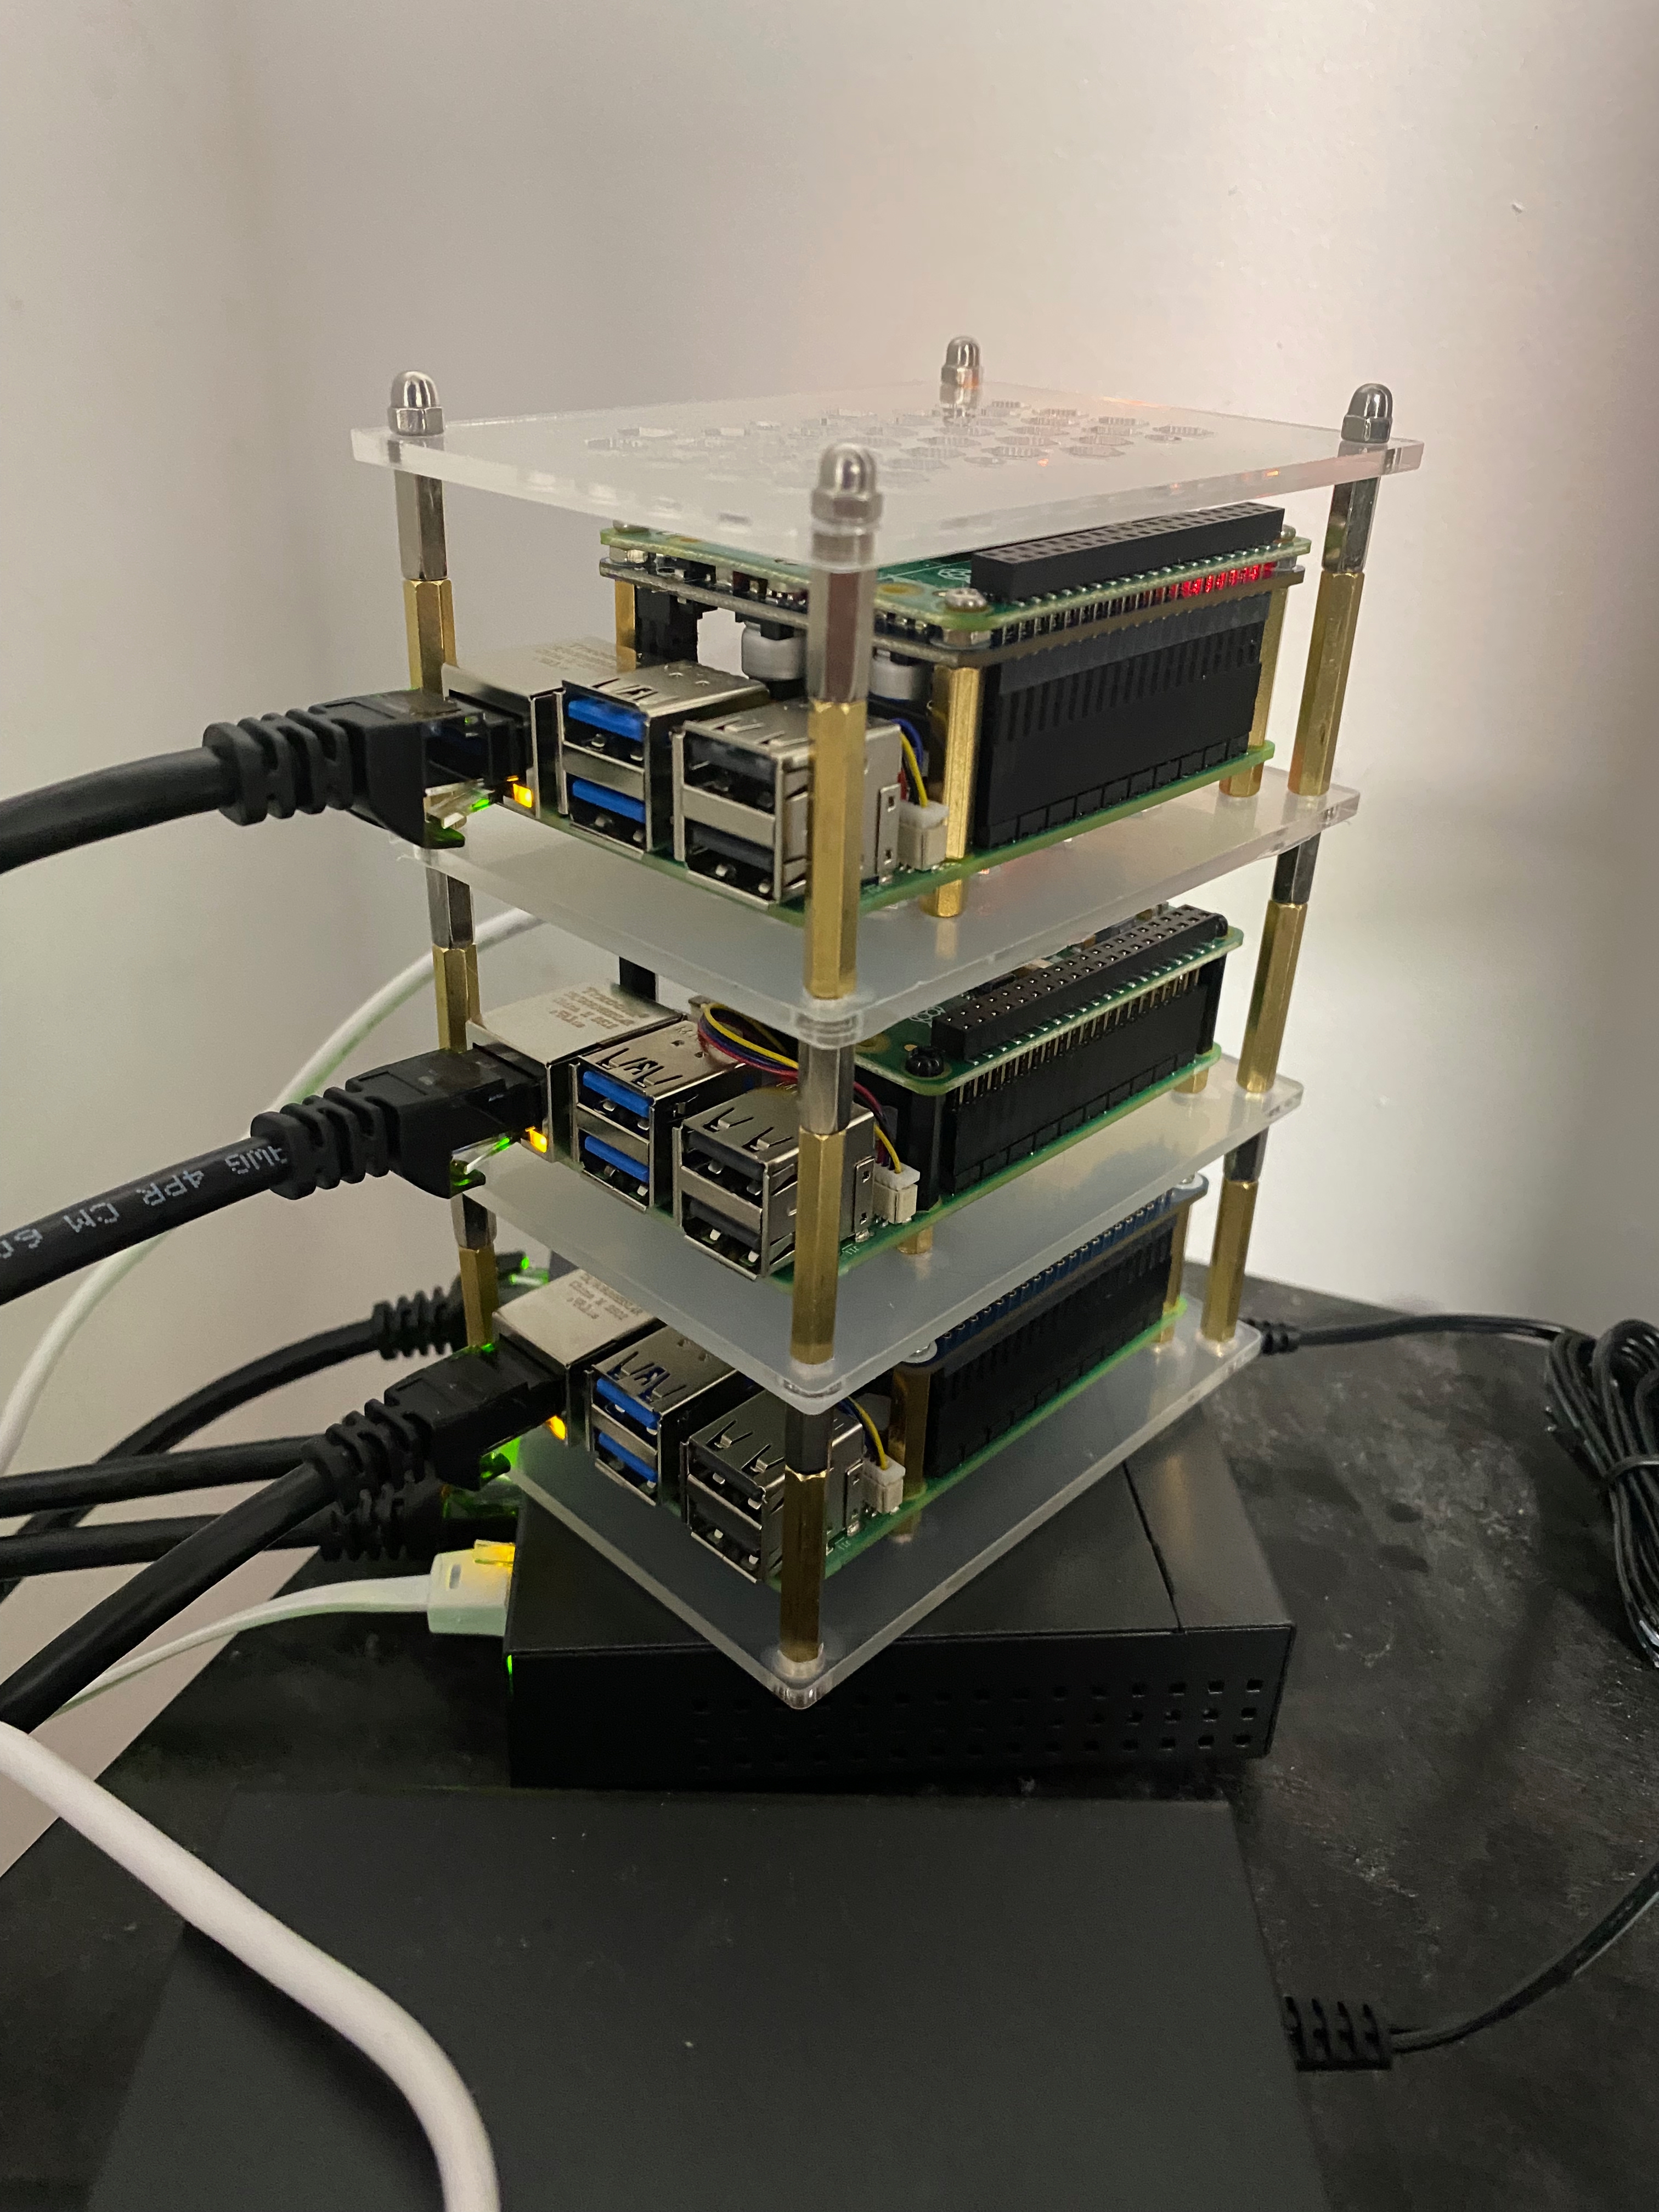
Note: The third Pi server is a Pi-hole server I originally set up to block ads and trackers on my local network, but it's unrelated to this project.
The Journey
The setup process involved several key phases. First, I set up each Raspberry Pi with a microSD card, then migrated from microSD to NVMe storage (requiring firmware updates and boot configuration). Next, I configured Raspberry Pi OS for Kubernetes compatibility by enabling cgroups and disabling ZRAM swap. Then I installed Kubernetes 1.33.2 with containerd as the container runtime. Finally, I set up networking with Calico (my choice for CNI), storage with local-path-provisioner (required so your cluster can have PVCs), and load balancing with MetalLB (required so your cluster can have external IP addresses on your local network, which Istio will request in my case).
What made this project particularly interesting for me were the Raspberry Pi-related setups that are usually taken care of by cloud providers but now required to be set up by yourself. Setting up Calico, local-path-provisioner, and MetalLB was a bit of a challenge, but their respective documentation is very helpful and fairly clear. And when all else fails, Gemini or ChatGPT came to the rescue!
For the complete step-by-step guide with all commands, configurations, and detailed explanations, see the Complete Setup Documentation section below. The documentation includes everything you need to replicate this setup, from initial OS installation through cluster initialization and add-on configuration.
Lessons Learned
Throughout this setup, I encountered several gotchas that aren't always obvious from standard Raspberry Pi or Kubernetes guides:
- NVMe card compatibility - Even though the specifications were all aligned, the NVMe card purchased with the original M.2 PoE Hat+ was not compatible with the Raspberry Pi 5. I had to purchase a new Hat+ M.2 NVMe card specifically built for the Raspberry Pi 5, which eventually forced me to purchase a new PoE Hat+, to ensure I could leverage my PoE switch.
- Firmware updates - Setting up the Pi server originally and then moving to the NVMe SSD card, including the boot support, was fraught with issues. I ended up following an exact order of operations to ensure everything was in the right place, properly configured (detailed below).
- CNI and Calico - One of the items I learned about, especially since it's usually taken care of by cloud providers, was CNI and Calico. Understanding how pod networking works at a fundamental level was very interesting.
- MetalLB - Similar to CNI, I learned about MetalLB, which is required to expose external IP addresses on your local network. This is essential for LoadBalancer services in a bare-metal environment.
- Local storage - I also learned about local storage and the local-path-provisioner, which enables persistent volume claims in a single-node or local storage scenario.
- Helpful guides - There are many guides available online, but I found this one to be the most helpful: YouTube: How to Install Kubernetes with Kubeadm (2025 Update) Full Cluster Setup Walkthrough. It's clear, simple, and to the point, with accompanying documentation: Installing Kubernetes.
Conclusion
Building a Kubernetes cluster on Raspberry Pi 5 is not only possible but also a fantastic learning experience. The hardware is affordable, the setup teaches you the internals of Kubernetes, and the result is a fully functional cluster perfect for development, testing, and homelab projects.
Whether you're learning Kubernetes, building a homelab, or experimenting with edge computing, a Raspberry Pi Kubernetes cluster is an excellent investment of time and effort. The complete documentation below includes all the step-by-step instructions, commands, and configuration files you need to build a similar cluster and avoid the pitfalls I encountered.
It's worth noting that the chatbot project running on this cluster was fairly easy to complete, and surprisingly, it delivered much better performance than expected, especially when compared to my local Docker Desktop Kubernetes cluster instance. Qwen3 is serving a few more tokens per second, which is an appreciated improvement over my local setup.
Complete Setup Documentation
For your reference, here is the complete setup documentation and configuration files I used for this cluster:
Complete README.md
# Pi K8s Cluster

# Hardware

-   **Raspberry Pi 5 (8GB)**
-   **Storage**: NVMe SSDs (512GB), microSD (16GB or 32GB) for original setup
-   **Adapters**: Raspberry Pi M.2 HAT+, Waveshare PoE HAT (G)
-   **Network**: TP-Link 5 Port Gigabit PoE Switch
-   **Accessories**: Standoffs, Ethernet Cables, NVMe Enclosure (for setup)

## Setup Section

### 1. OS Installation
-   Download **Raspberry Pi Imager**.
-   Select **Raspberry Pi OS Lite (64-bit)**.
-   **Settings (Gear Icon)**:
    -   Enable SSH.
    -   Set Username/Password.
    -   Set Hostname.
-   Flash to microSD Card.

*(Perform these steps for EACH server node: 1 Control Plane, and your Worker Nodes, using a different hostname for each)*

### 1.1. NVMe Setup (Migrating from microSD)
These steps describe how to update the firmware and migrate your OS from the microSD card to the NVMe drive for better performance.

#### Step A: Firmware Update
1.  **Boot from microSD**: Install the card, connect power/ethernet, and connect via SSH to the raspberry pi server currently being setup.
2.  **Update OS**:
    ```bash
    sudo apt update && sudo apt full-upgrade
    ```
3.  **Check Firmware**:
    ```bash
    sudo rpi-eeprom-update
    ```
    -   *If date is Dec 6, 2023 or later*: You are good.
    -   *If older*: Run `sudo raspi-config` > **Advanced Options** > **Bootloader Version** > **Latest**.
    -   Then update:
        ```bash
        sudo rpi-eeprom-update -a
        ```
    -   Press 'tab' to reach 'Finish' and type 'Enter'.
4.  **Reboot**:
    -   Once completed, reboot the server:
        ```bash
        sudo reboot
        ```
    -   **Validation**: Run `sudo rpi-eeprom-update` again. It should show the latest date.

#### Step B: Hardware & Driver Config
1.  **Install Hardware**: Shutdown (`sudo shutdown -h now`), disconnect power and ethernet cables, and install your **Active Cooling**, **Waveshare PoE HAT (G)** and **Raspberry Pi M.2 HAT+** with the NVMe drive.
2.  **Power Up**: Connect power and ethernet cables, and power up the server.
3.  **Enable NVMe**:
    -   Boot back up (it should be booting up from microSD still).
    -   **Validation**: Run `lspci` (should see the drive controller) and `lsblk` (should see `nvme0n1`, although the microSD card is still mounted as `/dev/mmcblk0` and used as boot drive).
    -   Edit config:
        ```bash
        sudo vi /boot/firmware/config.txt
        ```
    -   Add these lines to the bottom of the file:
        ```text
        dtparam=nvme
        dtparam=pciex1_gen=3
        ```
        *(Explanation: `pciex1_gen=3` forces the PCIe bus to Gen 3 speeds, significantly boosting NVMe performance.)*
    -   Reboot (`sudo reboot`).
    -   **Validation**: Run `lspci` (should see the drive controller) and `lsblk` (should see `nvme0n1` - same as before).

#### Step C: Partition & Clone
1.  **Partition NVMe**:
    ```bash
    sudo fdisk /dev/nvme0n1
    ```
    -   Type `n` (new partition), `p` (primary), `1` (partition number).
    -   Press **Enter** twice (accept defaults).
    -   Type `w` (write changes).
2.  **Clone OS** (Copy microSD to NVMe):
    ```bash
    sudo dd if=/dev/mmcblk0 of=/dev/nvme0n1 bs=4MB status=progress
    ```
    *(Wait for this to complete 100%)*
    **Note: Do NOT reboot yet!**

#### Step D: Boot Order & Finalize
1.  **Set NVMe Boot**:
    -   Run `sudo raspi-config`.
    -   Go to **6 Advanced Options** > **A4 Boot Order**.
    -   Select **B2 NVMe Boot**.  Press 'tab' to reach 'Finish' and type 'Enter'.
    -   Finish and Reboot (`sudo reboot`).
2.  **Verify & Cleanup**:
    -   Shutdown, **remove the microSD card**, and power back on.
    -   Expand Filesystem (to use full disk):
        ```bash
        sudo raspi-config
        ```
        -   **6 Advanced Options** > **A1 Expand Filesystem**.
    -   Finish and Reboot (`sudo reboot`).

### 2. Boot Configuration (The "Rite of Passage" Fixes)
Perform these following steps on **every** Raspberry Pi node.

#### Enable Cgroups
*Why*: Raspberry Pi OS disables the `memory` cgroup by default to save resources, but Kubernetes requires it to manage pod memory limits.

1.  Edit the cmdline file:
    ```bash
    sudo vi /boot/firmware/cmdline.txt
    ```
    *(Note: If that path doesn't exist, try `/boot/cmdline.txt`)*

2.  **Append** exactly this to the end of the existing line (**_do not create a new line_**):
    ```text
    cgroup_enable=cpuset cgroup_enable=memory cgroup_memory=1
    ```
    **Validation**: After rebooting, run `cat /proc/cgroups | grep memory`. If the last number is `1`, it is enabled.

#### Disable Swap (ZRAM)
*Why*: The Kubelet fails if swap is on because it breaks resource scheduling. RPi OS uses "ZRAM" (compressed RAM swap) which persists even after standard disable commands.

1.  Disable for current session:
    ```bash
    sudo swapoff -a
    ```
2.  Disable permanently (persists after reboot):
    ```bash
    sudo systemctl disable --now dev-zram0.swap
    sudo systemctl disable --now systemd-zram-setup@zram0.service
    sudo systemctl disable --now rpi-zram-writeback.timer
    sudo systemctl mask dev-zram0.swap
    ```
    **Validation**: Run `free -m`. "Swap" total should be `0`. This prevents Kubelet start failures.

### 3. Network & SSH
-   Verify your IP address: `hostname -I`
-   *(Note: This setup relies on your Router's DHCP or default IP assignment; static IPs were not configured on the OS level.)*

---

# Kubernetes Installation

### 1. Prepare System Settings (All Nodes)

**Enable IP Forwarding**
*Why*: Standard guides try to edit `/etc/sysctl.conf`, but newer OS versions use "drop-in" files.

```bash
echo "net.ipv4.ip_forward=1" | sudo tee /etc/sysctl.d/99-kubernetes-cri.conf
sudo sysctl --system
```
**Validation**: Run `sysctl net.ipv4.ip_forward`. It must return `1`.

### 2. Install Containerd (All Nodes)

**Install**
```bash
sudo apt-get install -y containerd
```

**Configure** (Critical for default RPi OS)
*Why*: The default containerd config uses the `cgroupfs` driver, but Kubernetes requires the `systemd` driver. This mismatch will crash the Kubelet.

```bash
# create /etc/containerd directory for containerd configuration
sudo mkdir -p /etc/containerd

# Generate the default containerd configuration
# Change the pause container to version 3.10 (pause container holds the linux ns for Kubernetes namespaces)
# Set `SystemdCgroup` to true to use same cgroup drive as kubelet
containerd config default \
| sed 's/SystemdCgroup = false/SystemdCgroup = true/' \
| sed 's|sandbox_image = ".*"|sandbox_image = "registry.k8s.io/pause:3.10"|' \
| sudo tee /etc/containerd/config.toml > /dev/null

# Restart containerd to apply the configuration changes
sudo systemctl restart containerd
```

### 3. Install Kubernetes Tools (All Nodes)

**Install toolings**
```bash
# update packages
sudo apt update

# install apt-transport-https ca-certificates curl and gpg packages using
# apt package manager in order to fetch Kubernetes packages from
# external HTTPS repositories
sudo apt-get install -y apt-transport-https ca-certificates curl gpg
```

**Add Repo (v1.33)**
```bash
# create a secure directory for storing GPG keyring files
# used by APT to verify trusted repositories.
# This is part of a newer, more secure APT repository layout that
# keeps trusted keys isolated from system-wide GPG configurations
sudo mkdir -p -m 755 /etc/apt/keyrings

# download the k8s release gpg key FOR 1.33
sudo curl -fsSL https://pkgs.k8s.io/core:/stable:/v1.33/deb/Release.key | sudo gpg --dearmor -o /etc/apt/keyrings/kubernetes-apt-keyring.gpg


# Download and convert the Kubernetes APT repository's GPG public key into
# a binary format (`.gpg`) that APT can use to verify the integrity
# and authenticity of Kubernetes packages during installation.
# This overwrites any existing configuration in
# /etc/apt/sources.list.d/kubernetes.list FOR 1.33
# (`tee` without `-a` (append) will **replace** the contents of the file)
echo 'deb [signed-by=/etc/apt/keyrings/kubernetes-apt-keyring.gpg] https://pkgs.k8s.io/core:/stable:/v1.33/deb/ /' | sudo tee /etc/apt/sources.list.d/kubernetes.list

# update packages in apt
sudo apt-get update

apt-cache madison kubelet
apt-cache madison kubectl
apt-cache madison kubeadm
```

**Install and Hold Packages**
```bash
KUBE_VERSION="1.33.2-1.1"

# install kubelet, kubeadm, and kubectl at version 1.33.2-1.1
sudo apt-get install -y kubelet=$KUBE_VERSION kubeadm=$KUBE_VERSION kubectl=$KUBE_VERSION

# hold these packages at version
sudo apt-mark hold kubelet kubeadm kubectl
```

**Fix CNI Path** (Run on **ALL** nodes)
*Why*: RPi OS puts CNI plugins in `/usr/lib/cni`, but Kubelet looks in `/opt/cni/bin`.
```bash
sudo mkdir -p /usr/lib/cni
sudo ln -s /opt/cni/bin/* /usr/lib/cni/
```
*(Explanation: Resolves `failed to find plugin "calico"` errors seen in kubelet logs.)*


### 4. Initialize Cluster (Control Plane Only)

**Run Init**
```bash
# Initialize the cluster specifying containerd as the container runtime, ensuring that the --cri-socket argument includes the unix:// prefix
# containerd.sock is a Unix domain socket used by containerd
# The Unix socket mechanism is a method for inter-process communication (IPC) on the same host.
sudo kubeadm init --pod-network-cidr=10.244.0.0/16 --cri-socket=unix:///run/containerd/containerd.sock

# HOW TO RESET IF NEEDED
# sudo kubeadm reset --cri-socket=unix:///run/containerd/containerd.sock
# sudo rm -rf /etc/kubernetes /var/lib/etcd
```
> [!NOTE]
> We use `10.244.0.0/16` (the 10.x.x.x range) instead of the common `192.168.0.0/16` to prevent **IP Conflicts**. Your home network likely uses `192.168.x.x`, so if the Pod Network overlapped, traffic wouldn't route correctly.

**Setup Local Access**
```bash
# ONLY ON CONTROL PLANE (also in the output of 'kubeadm init' command)
mkdir -p $HOME/.kube
sudo cp -i /etc/kubernetes/admin.conf $HOME/.kube/config
sudo chown $(id -u):$(id -g) $HOME/.kube/config
```
**Validation**: Run `kubectl get nodes`. You should see your control plane node with a status of `NotReady`.

### 5. Install Networking / CNI (Control Plane Only)

**Install Calico**
*Why Download?*: We must download the YAML file manually because the default `CALICO_IPV4POOL_CIDR` is `192.168.0.0/16`. We need to edit it to match our custom `10.244.0.0/16` CIDR.

```bash
curl -O https://raw.githubusercontent.com/projectcalico/calico/v3.27.0/manifests/calico.yaml
sed -i 's/# - name: CALICO_IPV4POOL_CIDR/- name: CALICO_IPV4POOL_CIDR/' calico.yaml
sed -i 's/#   value: "192.168.0.0\/16"/  value: "10.244.0.0\/16"/' calico.yaml
kubectl apply -f calico.yaml
```
**Validation**: Run `kubectl get nodes`. You should see your control plane node status change from `NotReady` to `Ready`.

### 6. Install Storage Class (Control Plane Only)

1. Run `kubectl apply -f https://raw.githubusercontent.com/rancher/local-path-provisioner/master/deploy/local-path-storage.yaml`
2. Patch the storage class: `kubectl patch storageclass local-path -p '{"metadata": {"annotations":{"storageclass.kubernetes.io/is-default-class":"true"}}}'`
3. Verify: `kubectl get sc should show local-path (default)`


### 7. Install MetalLB (Control Plane Only)

Add the MetalLB Helm repository and update it:
```bash
# Add the MetalLB Helm repository
helm repo add metallb https://metallb.github.io/metallb
helm repo update
```

Install MetalLB:
```bash
helm install metallb metallb/metallb \
  -f values.yaml \
  -n metallb-system \
  --create-namespace
```

Apply the MetalLB configuration:
```bash
kubectl apply -f config.yaml
```


### 8. Join Worker Nodes

**Join the Cluster**
*Why*: Worker nodes provide the compute power for your applications. They must "join" the control plane to receive instructions.

1.  **Get Join Command** (Run on **Control Plane**):
    *   Use the command output at the end of the `kubeadm init` step.
    *   *If you lost it*, recreate it:
        ```bash
        kubeadm token create --print-join-command
        ```

2.  **Run Join Command** (Run on **Worker Nodes**):
    *   Paste the full command (starts with `sudo kubeadm join ...`) into your worker node's terminal.

**Validation**:
On the **Control Plane**, run:
```bash
kubectl get nodes
```
*Success*: You should see all your worker nodes listed with status `Ready` (it may take a minute or two).

### 7. Optional: Workloads on Control Plane

**Allow Workloads**
*Why*: By default, the control plane has a "taint" ensuring only system processes run on it. For a home lab with limited nodes, you might want to use its CPU/RAM for your apps.

1.  **Check for Taint**:
    ```bash
    kubectl describe node  | grep Taint
    ```
    *Look for: `node-role.kubernetes.io/control-plane:NoSchedule`*

2.  **Remove Taint** (Allow workloads on ALL nodes):
    ```bash
    kubectl taint nodes --all node-role.kubernetes.io/control-plane-
    ```
    *(Note the minus sign `-` at the end of the command)*

---

## Client Setup (Mac)

1.  **Install kubectl**: `brew install kubectl`
2.  **Copy Config**:
    ```bash
    scp @:/etc/kubernetes/admin.conf ~/.kube/config
    ```
3.  **Clean up Contexts**: Rename the cluster and user to `pik8s-cluster` / `pik8s-admin` to avoid generic name collisions.
4.  **Hostname Resolution**: Update `/etc/hosts` on your Mac to resolve the control plane hostname to its IP (optional).

## References

-   **Install Video**: [YouTube - Install Kubernetes on Raspberry Pi](https://youtu.be/MwrdwbYI_7M?si=QzKTaJq1ydAjq_Tz)
-   **Security Course Guide**: [GitLab - Installing Kubernetes](https://gitlab.com/chadmcrowell/container-security-course/-/raw/main/0-Introduction-and-Setup/Installing-Kubernetes.md)
- https://www.raspberrypi.com/documentation/accessories/m2-hat-plus.html
MetalLB Configuration Files
config.yaml
apiVersion: metallb.io/v1beta1
kind: IPAddressPool
metadata:
  name: first-pool
  namespace: metallb-system
spec:
  addresses:
    - 192.168.2.240-192.168.2.250 # <--- UPDATE THIS RANGE to match your network
---
apiVersion: metallb.io/v1beta1
kind: L2Advertisement
metadata:
  name: example
  namespace: metallb-system
spec:
  ipAddressPools:
    - first-pool
values.yaml
# Default values are usually fine for MetalLB 0.13.x+ on standard setups.
# If you encounter issues with the control plane node not scheduling the speaker,
# you might need tolerations, but modern charts handle this well.

controller:
  tolerations:
  - effect: NoSchedule
    key: node-role.kubernetes.io/master
    operator: Exists
  - effect: NoSchedule
    key: node-role.kubernetes.io/control-plane
    operator: Exists

speaker:
  tolerations:
  - effect: NoSchedule
    key: node-role.kubernetes.io/master
    operator: Exists
  - effect: NoSchedule
    key: node-role.kubernetes.io/control-plane
    operator: Exists
References
- YouTube - Install Kubernetes on Raspberry Pi
- GitLab - Installing Kubernetes Guide
- Raspberry Pi M.2 HAT+ Documentation
AI Usage Disclosure
This document was created with assistance from AI tools. The content has been reviewed and edited by a human. For more information on the extent and nature of AI usage, please contact the author.