How to setup a NVIDIA Jetson Orin Nano as a Kubernetes worker node
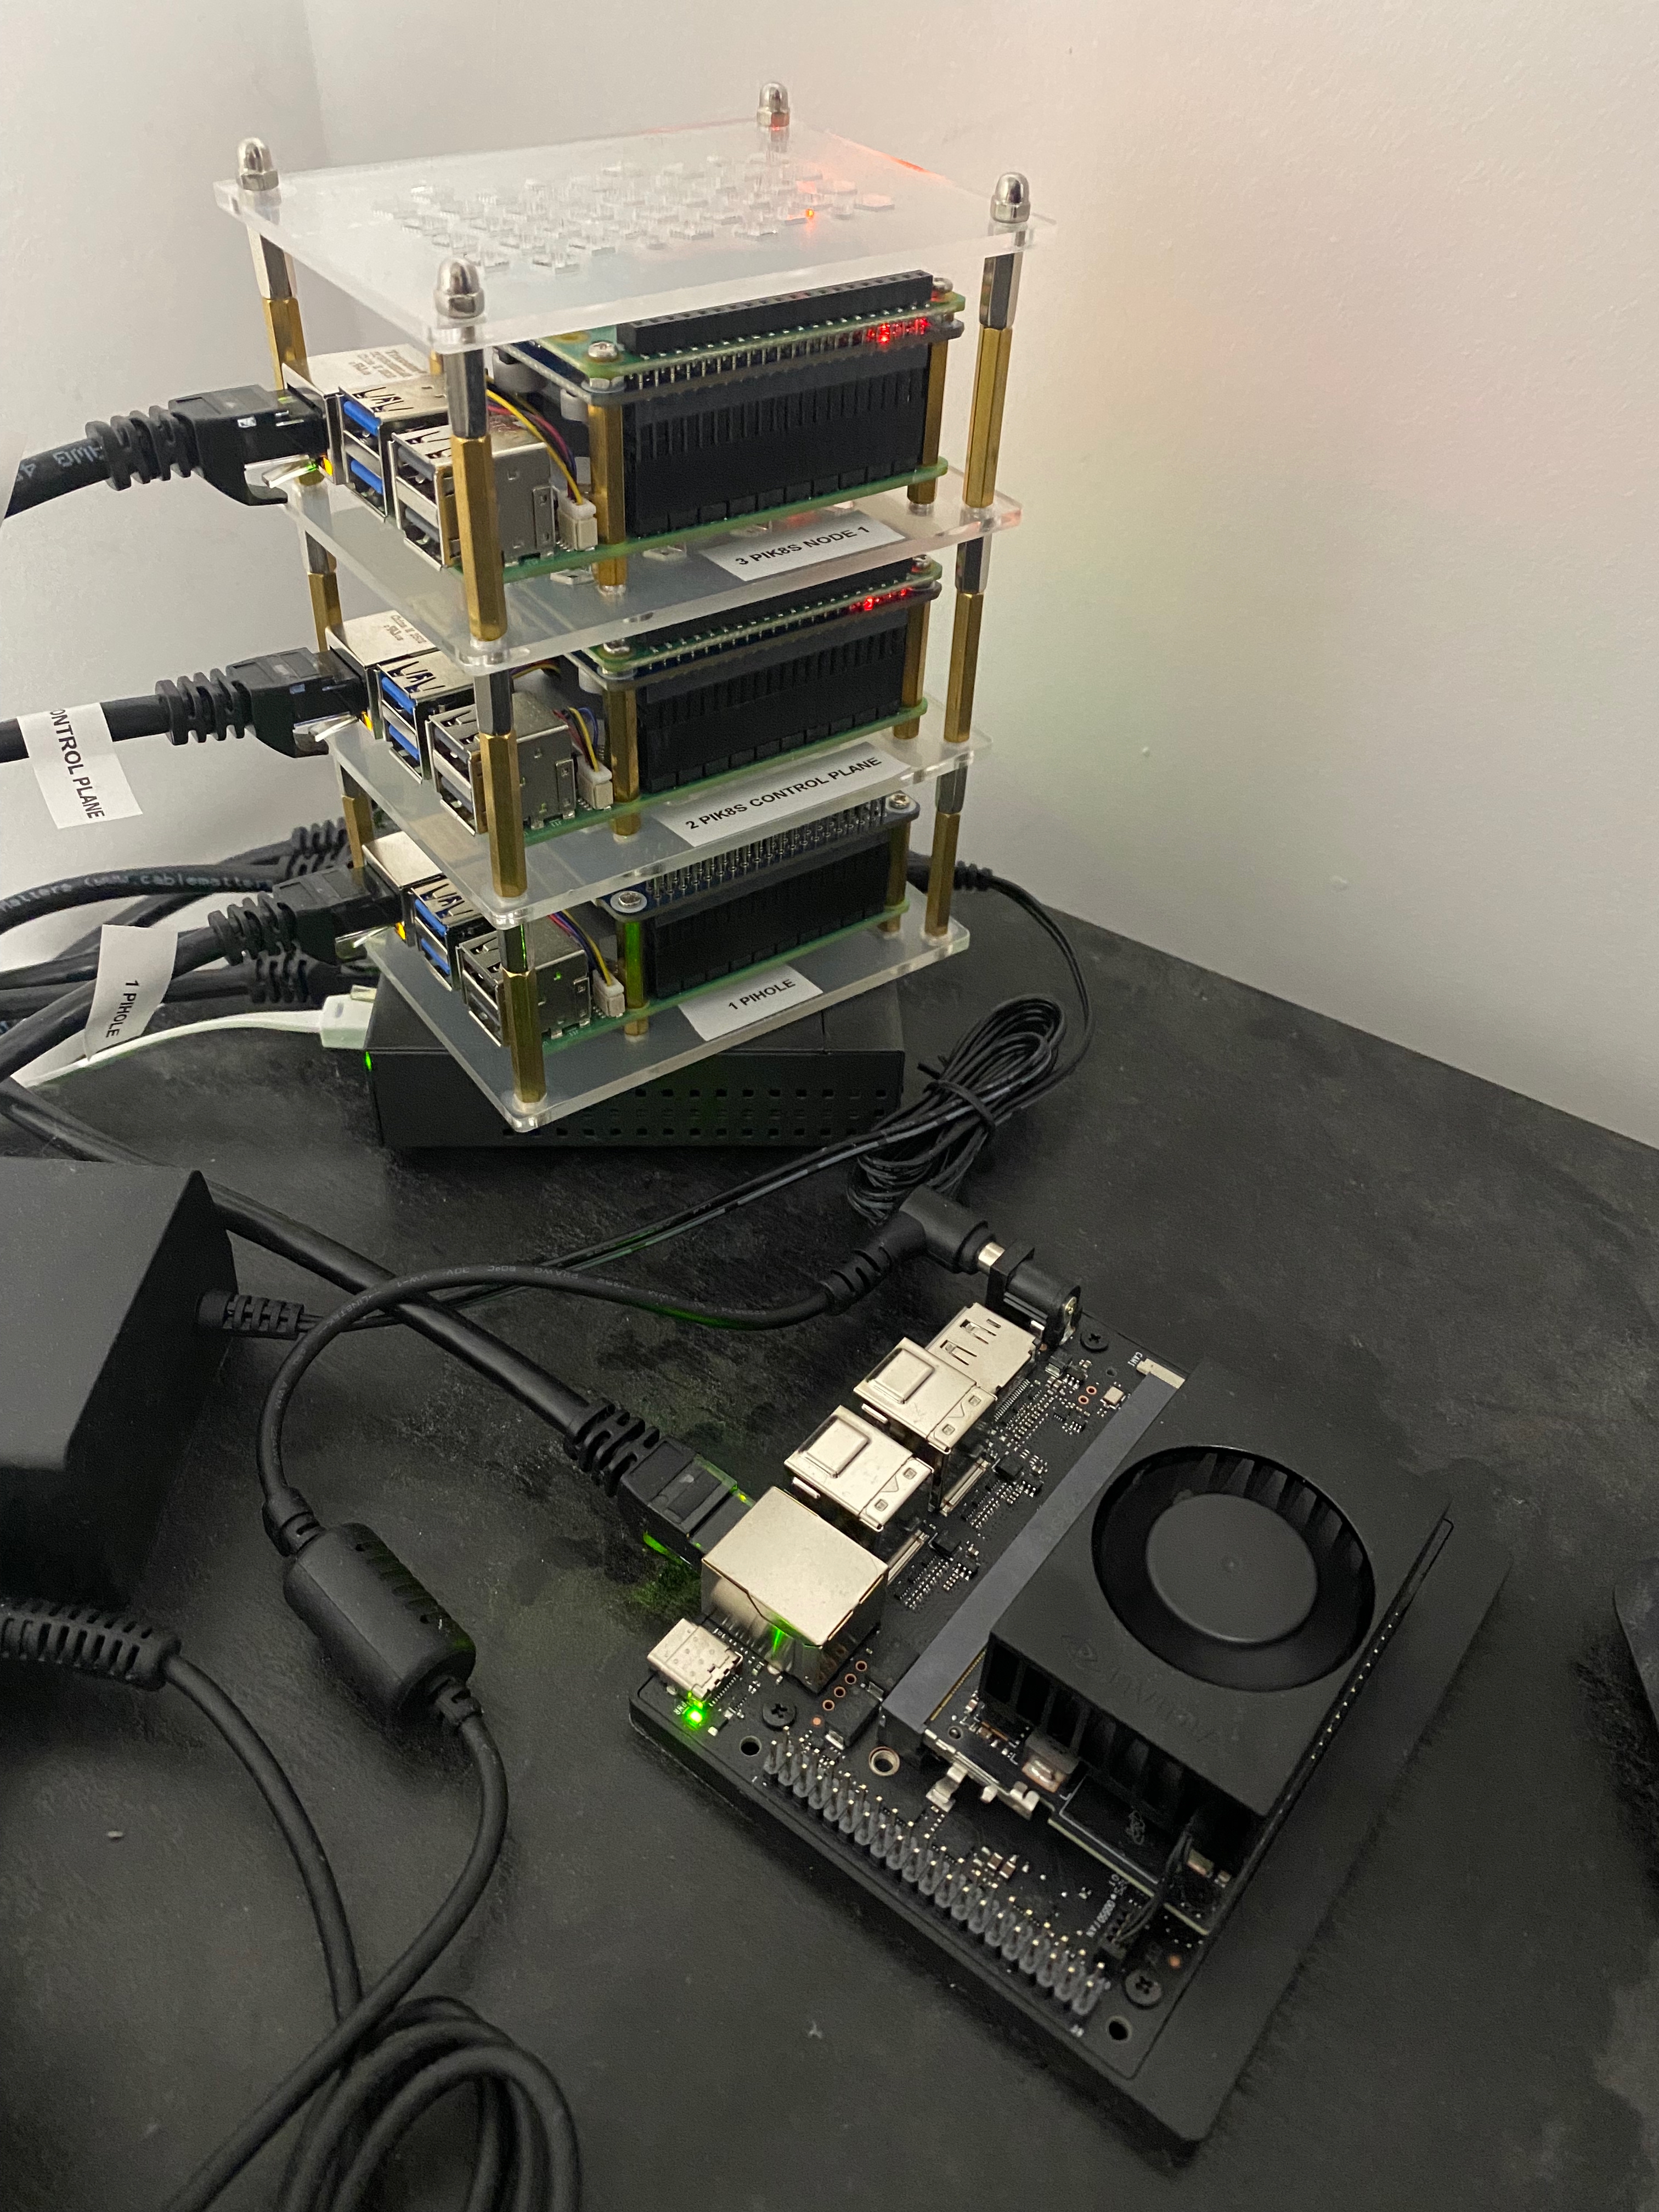
After building a Raspberry Pi 5 Kubernetes cluster, the natural next step was to add a GPU-accelerated worker node so I could run AI workloads on something more efficient than a Raspberry Pi 5 CPU (which wasn't that bad actually!). The NVIDIA Jetson Orin Nano Super Developer Kit felt like the perfect fit: Nvidia equivalent of a Raspberry Pi 5 but with a GPU. What I did not expect was how far down the rabbit hole of kernel rebuilds and bootloaders this project would take me.
Getting this Jetson to behave like "just another" Kubernetes worker required far more than following a vendor quick-start. To run Calico, boot from NVMe, and expose the GPU cleanly to Kubernetes, I ended up recompiling the kernel many, many, MANY times and effectively "bricked" the board at least 20 times. Each failure meant booting from a rescue microSD card, carefully restoring a known-good kernel and initramfs, and trying again with one more tweak. A tedious and long process!
What I Actually Built
The final setup looks simple on paper: a Jetson Orin Nano Super joined to the same Raspberry Pi
Kubernetes cluster as a dedicated GPU worker. It boots from a 512GB NVMe SSD, runs the same
Kubernetes version as the Pi nodes, and advertises nvidia.com/gpu so I can schedule GPU
workloads with standard Kubernetes manifests, while being "tainted" so that no other workloads are
scheduled on it. The reality behind that simplicity, however, is a long series of small but critical
changes to the underlying Linux platform, Tegra Linux and JetPack.
Beyond the usual Kubernetes prerequisites (cgroups, swap-off, IP forwarding), the real work was in enabling missing XFRM and netfilter pieces for Calico, rebuilding the L4T kernel so PCIe and NVMe drivers were built-in instead of modules, regenerating an initramfs that actually contained the right NVIDIA drivers (I'd be lying to say I understood everything), and wiring containerd and the NVIDIA Container Toolkit together so the GPU could be exposed via the Kubernetes device plugin. Every time I got one of those details wrong, the Orin would power on, spin the fan for a few seconds, and then quietly shut itself off, with no logs, no SSH, just another "brick" to recover from.
Lessons Learned
Looking back, this project was fun and provided a huge amount of learning opportunities about Linux, not so much about Nvidia GPU (at least not yet) or Kubernetes:
- Kernel configuration is unforgiving at this level of the stack. On the Jetson
booting from NVMe, a single wrong flag, built-in (
=y) vs loadable module (=m), is the difference between a working node and a board that silently shuts itself off five seconds after power-on. No logs, no SSH, just silence. - The initrd will brick your board and tell you nothing. The Jetson's early boot requires a specific chain of hardware drivers to be baked into the initrd image. If any are missing, a hardware watchdog trips and the board shuts down within seconds. The fix is simple once you know it, finding out that this was the cause is not.
- A working board can be "bricked" by a routine
apt upgrade. Once the custom kernel was stable, a system update silently overwrote it with the stock L4T kernel, and the board stopped booting from NVMe again. The fix is to hold the critical kernel packages (apt-mark hold) immediately after a successful build. It's a five-second step that's easy to skip when you're relieved it finally works.
The end result is a surprisingly capable little GPU node that slots neatly into my Raspberry Pi Kubernetes cluster and runs AI workloads as if it were any other worker. It took a lot of time to get there, and a lot of bricks, but I came out the other side with a much deeper understanding of Linux than I expected from what was supposed to be a Kubernetes project.
Below is the complete README.md for the setup and how to reproduce it.
Complete README.md
# Nvidia Jetson Orin Nano Super — K8s Worker Node

This guide covers how to set up an **NVIDIA Jetson Orin Nano Super Developer Kit** as a GPU-enabled worker node in the Raspberry Pi Kubernetes cluster. It assumes you already have the cluster running (control plane + existing workers) as described in the [pi-k8s-cluster](../pi-k8s-cluster/) guide.

# Hardware

-   **NVIDIA Jetson Orin Nano Super Developer Kit** (8GB LPDDR5)
    -   6-core Arm Cortex-A78AE (64-bit), 1024 CUDA cores, 67 TOPS AI performance
    -   Carrier board with 1x GbE, 4x USB 3.2 Type-A, 1x USB-C, DisplayPort 1.2, 40-pin GPIO header
    -   M.2 Key-M 2280 slot (PCIe Gen 3 x4) — primary NVMe slot (underside of carrier board)
    -   M.2 Key-M 2230 slot (PCIe Gen 3 x2) — secondary NVMe slot (underside of carrier board)
    -   M.2 Key-E 2230 slot — pre-populated with 802.11ac Wi-Fi card
    -   microSD card slot (underside of module)
    -   4-pin fan header (J13), heatsink + fan included
    -   19V DC barrel jack power supply included
-   **Storage**: Raspberry Pi 512GB NVMe SSD (Biwin CE430TSD100-512, **M.2 2230** form factor, PCIe), microSD card (64GB+ for initial boot)
-   **Network**: Ethernet Cable (connects to same switch as Pi cluster)
-   **Cable**: USB-C to USB-C/USB-A cable (for headless OEM configuration via serial console over USB-C)

> [!NOTE]
> The Developer Kit does **NOT** include an NVMe SSD or microSD card.

> [!NOTE]
> The Raspberry Pi 512GB NVMe SSD is an M.2 **2230** form factor drive. It goes into the **M.2 Key-M 2230 slot** (PCIe Gen 3 x2) — the shorter of the two M.2 slots on the underside of the carrier board. This slot has its own screw standoff positioned at the 2230 length. The 2230 and 2280 slots are separate physical connectors, not the same slot with two standoff positions. The x2 lane provides more than enough bandwidth for an OS boot drive and Kubernetes worker node.

## Setup Overview

Since I don't have an Ubuntu 22.04 x86_64 host machine (required for NVIDIA SDK Manager), and do not want to have one, we follow the **microSD card → NVMe migration** path:

1.  Flash the JetPack SD card image to a microSD card from macOS
2.  Boot the Jetson from the microSD card
3.  Complete headless OEM configuration via USB-C serial console (no monitor needed)
4.  Install the NVMe SSD and migrate the OS from microSD → NVMe
5.  Boot from NVMe, remove the microSD card
6.  Configure the system for Kubernetes and join the cluster

---

## Setup Section

### 1. Flash the microSD Card (on your Mac)

*Why*: The Jetson Orin Nano has no onboard eMMC storage. We start by booting from a microSD card, then migrate to NVMe for better performance.

#### Step A: Download the JetPack SD Card Image

1.  Go to the [JetPack SDK download page](https://developer.nvidia.com/embedded/jetpack).
2.  Scroll to the **"SD Card Image Method"** section.
3.  Click **"Download for Jetson Orin Nano Super Developer Kit"**.
    -   The file is named something like `jp62-orin-nano-sd-card-image.zip` (~5–10 GB).

#### Step B: Flash the Image to the microSD Card

**Using Balena Etcher (Recommended)**:
1.  Download and install [Balena Etcher](https://etcher.balena.io/) if you don't have it.
2.  Launch Etcher.
3.  Click **"Select image"** and choose the downloaded `.zip` file (no need to unzip first — Etcher handles it).
4.  Insert your microSD card (64GB or larger recommended).
5.  If macOS shows a dialog saying it cannot read the disk, click **"Ignore"**.
6.  Etcher should auto-select the microSD. If not, click **"Select drive"** and choose it.
7.  Click **"Flash!"** — takes roughly 10 minutes over USB 3.
8.  When done, macOS will say it cannot read the card. Click **"Eject"** and remove the card.

### 2. First Boot from microSD

1.  **Insert the microSD card** into the slot on the underside of the Jetson module.
2.  **Connect the Ethernet cable** to the same network/switch as your Pi cluster.
3.  **Do NOT connect a monitor** to the DisplayPort output — this is critical. If a display is detected, the OEM config wizard will direct its output to the GUI instead of the serial console, and you won't be able to complete the headless setup.
4.  **Connect the USB-C cable** from the Jetson's USB-C port to your Mac. This will be used for the serial console.
5.  **Connect the 19V power supply** to the barrel jack. The Jetson will power on and boot from the microSD card.

> [!IMPORTANT]
> Do NOT connect anything to the DisplayPort output. The OEM configuration wizard will only appear on the USB-C serial console if no display is detected.

### 3. Headless OEM Configuration (via USB-C Serial Console)

*Why*: On first boot, the Jetson runs an interactive OEM configuration wizard where you accept the EULA, select a language/timezone, and create a user account. Since we don't have a monitor, we complete this over the USB-C serial connection from the Mac. No additional hardware (USB-to-TTL adapter, jumper wires) is needed — the Jetson exposes a serial console over its USB-C port natively.

1.  **Wait ~30–60 seconds** after powering on for the Jetson to boot.

2.  **Find the serial device on your Mac**:
    ```bash
    ls /dev/tty.usbmodem*
    ```
    You should see a device like `/dev/tty.usbmodemXXXXXX`. If nothing appears, try a different USB-C cable (some cables are power-only without data lines).

3.  **Connect to the serial console**:
    ```bash
    screen /dev/tty.usbmodem* 115200
    ```

4.  **Press Enter** if you see a blank screen — the wizard prompt should appear.

5.  **Walk through the OEM configuration prompts** (text-based):
    -   **EULA**: Review and accept the NVIDIA Software License Agreement.
    -   **Language**: Select your language (e.g., English).
    -   **Timezone**: Select your timezone.
    -   **Username**: Create a user account (e.g., `jetson`).
    -   **Password**: Set the password for the account.
    -   **Hostname**: Set the hostname for the device.
    -   **Network**: The Ethernet connection should be auto-configured via DHCP.

6.  Once complete, you'll land at a login prompt. **Log in** with the username and password you just created.

> [!NOTE]
> Since the new OEM wizard allows to set the hostname, you should retrieve the IP as a precaution only.  You can then skip to step 10 and ssh using the hostname instead of the IP.

7.  **Find the Jetson's IP address**:
    ```bash
    hostname -I
    ```

8.  **Exit the screen session**: Press `Ctrl-A`, then `K`, then `Y` to confirm.

9.  **Disconnect the USB-C cable** — you no longer need it.

10. **SSH in from your Mac**:
    ```bash
    ssh -v @ # Or hostname if it was previously set.
    ```

> [!NOTE]
> From this point forward, **all remaining steps are performed over SSH**. Physical access is only needed once more to install the NVMe SSD.

---

### 4. Initial System Configuration

#### Step A: Update the System

```bash
sudo apt update && sudo apt full-upgrade -y
```

Reboot after the upgrade:
```bash
sudo reboot
```

#### Step B: Set the Hostname (skip if already set during OEM config)

If you already set the hostname during the OEM configuration wizard (Section 3), verify it with `hostname` and skip to Step C.

Otherwise, set it now:
```bash
sudo hostnamectl set-hostname pik8snodenvidia1
```

Edit `/etc/hosts` to add the hostname:
```bash
sudo vi /etc/hosts
```
Add/update the line:
```text
127.0.1.1   pik8snodenvidia1
```

#### Step C: Verify JetPack and Hardware

1.  **Check JetPack / L4T version**:
    ```bash
    cat /etc/nv_tegra_release
    ```
    *(Should show the L4T version corresponding to your JetPack release, e.g., `R36 (release), REVISION: 4.7` for JetPack 6.2.)*

2.  **Verify the microSD card is the current boot drive**:
    ```bash
    lsblk
    ```
    *(The root filesystem `/` should be mounted on `/dev/mmcblk0p1`. You should NOT see an NVMe device yet — we haven't installed it.)*

3.  **Check CUDA**:
    ```bash
    nvcc --version
    ```

    > [!NOTE]
    > If `nvcc` is not found, CUDA is installed but not in your PATH. Add it to your shell profile:
    > ```bash
    > echo 'export PATH=/usr/local/cuda/bin:$PATH' >> ~/.bashrc
    > echo 'export LD_LIBRARY_PATH=/usr/local/cuda/lib64:$LD_LIBRARY_PATH' >> ~/.bashrc
    > source ~/.bashrc
    > ```
    > Then re-run `nvcc --version`. Should display CUDA 12.6 for JetPack 6.2.

4.  **Check GPU**:
    ```bash
    sudo cat /sys/devices/gpu.0/railgate_enable
    ```
    *(Value `0` means the GPU is ungated/active. Value `1` means it's gated for power saving.)*

#### Step D: Install Monitoring Tools

*Why*: `jtop` is the Jetson equivalent of `htop` — it displays CPU/GPU temperatures, power draw, clock frequencies, fan speed, and CUDA utilization in a single TUI. Essential for monitoring thermals and performance throughout the setup.

```bash
# pip3 is not installed by default on JetPack — install it first
sudo apt install -y python3-pip

sudo pip3 install jetson-stats
sudo systemctl restart jtop.service
```

Run it with:
```bash
sudo jtop
```

> [!NOTE]
> `jtop` may show "JetPack: NOT DETECTED" — this is a cosmetic issue with certain jtop versions and does not indicate a problem with the JetPack installation.

> [!TIP]
> If `jtop` shows Xorg/gnome-shell processes consuming CPU/memory, you can switch to headless mode to reclaim resources:
> ```bash
> sudo systemctl set-default multi-user.target
> sudo reboot
> ```

---

#### Step E: Install zsh and oh-my-zsh

*Why*: Consistent shell environment across all cluster nodes.

```bash
# Install zsh
sudo apt install -y zsh

# Install oh-my-zsh (run as your user, NOT with sudo)
sh -c "$(curl -fsSL https://raw.githubusercontent.com/ohmyzsh/ohmyzsh/master/tools/install.sh)"

# Install useful plugins
git clone https://github.com/zsh-users/zsh-autosuggestions ${ZSH_CUSTOM:-~/.oh-my-zsh/custom}/plugins/zsh-autosuggestions
git clone https://github.com/zsh-users/zsh-syntax-highlighting ${ZSH_CUSTOM:-~/.oh-my-zsh/custom}/plugins/zsh-syntax-highlighting
```

Edit `~/.zshrc` to enable the plugins:
```bash
plugins=(git zsh-autosuggestions zsh-syntax-highlighting)
```

Add CUDA to your zsh PATH (same as bashrc) via editor:
```bash
sudo vi ~/.zshrc
```
Add the following lines:
export PATH=/usr/local/cuda/bin:$PATH
export LD_LIBRARY_PATH=/usr/local/cuda/lib64:$LD_LIBRARY_PATH

```bash
source ~/.zshrc
```

> [!IMPORTANT]
> You must `git clone` the plugin repos **before** referencing them in `~/.zshrc` — otherwise oh-my-zsh will print `plugin 'zsh-autosuggestions' not found` warnings on every shell start.


### 5. NVMe SSD Installation & OS Migration

*Why*: The microSD card works but NVMe provides 5–10x better I/O performance. We install the SSD, clone the OS, and switch to NVMe as the boot device.

#### Step A: Shutdown and Install the NVMe SSD

1.  **Shutdown the Jetson**:
    ```bash
    sudo shutdown -h now
    ```
2.  **Disconnect power** (unplug the barrel jack).
3.  **Flip the carrier board over** — the M.2 slots are on the underside.
4.  **Locate the M.2 Key-M 2230 slot** — this is the shorter of the two M.2 slots. It has its own screw standoff positioned at the 2230 length.
5.  **Insert the Raspberry Pi 512GB NVMe SSD** into the 2230 slot at an angle (~30°), then press it flat.
6.  **Secure with the screw** using a small Phillips screwdriver.
7.  **Flip the board back**, reconnect power and Ethernet. The Jetson will boot from the microSD card.

**Validation** (after booting and SSH-ing back in):
```bash
lsblk
```
You should now see both `/dev/mmcblk0` (microSD, root) and `/dev/nvme0n1` (the new NVMe SSD, unpartitioned).

#### Step B: Migrate OS to NVMe Using JetsonHacks Migration Tool

*Why*: The `migrate-jetson-to-ssd` tool from JetsonHacks is purpose-built for JetPack 6. It handles partitioning, data copy, and boot configuration in three scripts — cleaner and safer than a raw `dd` clone.

```bash
# Clone the migration tool
git clone https://github.com/jetsonhacks/migrate-jetson-to-ssd.git
cd migrate-jetson-to-ssd
```

**Step 1 — Create partitions on the NVMe SSD**:
```bash
sudo bash make_partitions.sh
```
*(This creates the partition table on `/dev/nvme0n1`, sized to use the full SSD. Run `make_partitions.sh -h` for options.)*

**Validation**: Run `lsblk`. You should see `nvme0n1p1` (and possibly additional partitions).

**Step 2 — Copy data from microSD to NVMe**:
```bash
sudo bash copy_partitions.sh
```
*(This copies the entire root filesystem from the microSD to the NVMe SSD. Wait for it to complete — this can take 10–20 minutes depending on how full your microSD card is.)*

**Step 3 — Configure NVMe as the boot device**:
```bash
sudo bash configure_ssd_boot.sh
```
*(This updates `/boot/extlinux/extlinux.conf` and `/etc/fstab` to point to the NVMe partitions instead of the microSD.)*

#### Step C: Boot from NVMe

1.  **Shutdown**:
    ```bash
    sudo shutdown -h now
    ```
2.  **Remove the microSD card** from the slot on the underside of the module.
    *(With the microSD absent, the UEFI bootloader will fall through to NVMe as the next available boot device.)*
3.  **Power on** (reconnect the barrel jack).

**Validation** (after booting and SSH-ing back in):
```bash
lsblk
```
The root filesystem `/` should now be mounted on `/dev/nvme0n1p1`. The microSD device (`mmcblk0`) should not appear.

```bash
# Verify disk performance improvement
sudo apt install -y hdparm

sudo hdparm -Tt /dev/nvme0n1
```

> [!NOTE]
> The UEFI bootloader in QSPI flash already supports NVMe boot — no QSPI firmware update is needed for this step. The boot order defaults to: SD → USB → NVMe. By removing the microSD card, NVMe becomes the first available boot device.

---

### 6. Configure Power Mode

*Why*: The Jetson defaults to the 15W power mode after a fresh install. For a Kubernetes worker node you likely want the best performance available. The `MAXN_SUPER` mode (uncapped) enables the highest clock frequencies on the "Super" variant. The included heatsink + fan is adequate for most workloads in a ventilated environment.

Available power modes:

| Mode ID | Name         | Power Budget | CPU Cores | CPU Max Freq | GPU Max Freq |
|---------|-------------|-------------|-----------|-------------|-------------|
| 0       | 15W          | 15 W        | 6         | 1510 MHz    | 625 MHz     |
| 1       | 7W           | 7 W         | 4         | 960 MHz     | 408 MHz     |
| 2       | MAXN_SUPER   | Uncapped    | 6         | 1728 MHz    | 1020 MHz    |

```bash
# Check current power mode
sudo /usr/sbin/nvpmodel -q

# Switch to MAXN_SUPER mode
sudo /usr/sbin/nvpmodel -m 2

# Maximize clocks within the current power mode (does NOT persist across reboot)
sudo jetson_clocks
```

#### Persist `jetson_clocks` Across Reboots

Create a systemd service so clocks are maximized on every boot:

```bash
sudo tee /etc/systemd/system/jetson-clocks.service > /dev/null < [!NOTE]
> The `After=nvpmodel.service` is important — it ensures the power mode (e.g., MAXN_SUPER / 25W) is set before clocks are maximized within it.

**Validation**:
```bash
sudo systemctl status jetson-clocks.service
sudo jetson_clocks --show   # shows current clock frequencies
```

Run `jtop` and verify the power mode shows `MAXN_SUPER` and clocks are at their maximums.

---

### 7. Boot Configuration (Kubernetes Prerequisites)

Perform these steps to prepare the Jetson for Kubernetes.

#### Enable Cgroups
*Why*: Same as the Pi cluster — Kubernetes requires the `memory` cgroup to manage pod memory limits. L4T may or may not have it enabled by default depending on the JetPack version.

1.  **Check if already enabled**:
    ```bash
    cat /proc/cgroups | grep memory
    ```
    If the last column is `1`, it's already enabled — skip to the next section.

2.  **If not enabled**, edit the kernel boot parameters:
    ```bash
    sudo vi /boot/extlinux/extlinux.conf
    ```
    *(Note: The Jetson uses `extlinux.conf` instead of `cmdline.txt` like the Raspberry Pi.)*

3.  Find the `APPEND` line and add to the end (**on the same line**):
    ```text
    cgroup_enable=cpuset cgroup_enable=memory cgroup_memory=1
    ```

4.  Reboot:
    ```bash
    sudo reboot
    ```

    **Validation**: Run `cat /proc/cgroups | grep memory`. The last column should be `1`.

#### Disable Swap (Including L4T's zram)
*Why*: The kubelet will not start if swap is enabled. It breaks Kubernetes' resource scheduling assumptions. L4T creates **zram swap devices** (one per CPU core — 6 on the Orin Nano Super) via the `nvzramconfig` service. These must also be disabled.

```bash
# Disable all swap for the current session
sudo swapoff -a

# Remove any swap entries from fstab
sudo sed -i '/swap/d' /etc/fstab

# Disable L4T's zram service (creates 6 zram swap devices on boot)
sudo systemctl disable nvzramconfig.service
sudo systemctl stop nvzramconfig.service

# Verify
free -m
```
**Validation**: `free -m` should show `Swap: 0 0 0`.

> [!WARNING]
> Even after the NVMe migration, `nvzramconfig` will re-enable zram swap on every boot. You **must** disable the service or swap will silently reappear and `kubeadm join` will fail with swap warnings.

#### Enable Required Kernel Modules
*Why*: Kubernetes networking (especially Calico CNI) requires `br_netfilter` and `overlay` kernel modules for pod networking and iptables rules.

```bash
cat < [!NOTE]
> The `overlay` module is compiled **built-in** to the L4T kernel, so `lsmod | grep overlay` will return **nothing** — this is expected and correct. Verify it's available with:
> ```bash
> grep overlay /proc/filesystems
> ```
> You should see: `nodev   overlay`


#### Enable IP Forwarding and Bridge Networking
*Why*: Same as the Pi cluster — pods need to communicate across nodes. Bridge networking lets iptables see bridged traffic.

```bash
cat < /dev/null

# Restart and enable containerd
sudo systemctl restart containerd
sudo systemctl enable containerd
```

**Validation**:
```bash
sudo systemctl status containerd
```
Should show `active (running)`.

---

### 9. Install NVIDIA Container Toolkit (GPU Support for Kubernetes)

*Why*: Without the NVIDIA Container Toolkit, containers running in Kubernetes pods cannot access the Jetson's GPU or CUDA libraries. This enables GPU-accelerated AI/ML workloads in your cluster.

> [!IMPORTANT]
> The older `nvidia-docker2` and `nvidia-container-runtime` packages are deprecated. Use `nvidia-container-toolkit` instead.

#### Step A: Install the Toolkit

The NVIDIA APT repository should already be configured by JetPack. Verify:
```bash
ls /etc/apt/sources.list.d/nvidia*
```

Install:
```bash
sudo apt-get update
sudo apt-get install -y nvidia-container-toolkit
```

#### Step B: Configure Containerd to Use the NVIDIA Runtime

```bash
# Configure containerd with the nvidia runtime and set it as default
sudo nvidia-ctk runtime configure --runtime=containerd --nvidia-set-as-default

# Restart containerd to pick up the new config
sudo systemctl restart containerd
```

#### Step C: Generate CDI (Container Device Interface) Specification

*Why*: On Jetson (Tegra) platforms, the standard `nvidia-container-cli` approach used for discrete GPUs does not work because the GPU is integrated (not a separate PCIe device). CDI mode with CSV sources is required to expose the GPU, CUDA libraries, and other NVIDIA resources to containers.

```bash
sudo nvidia-ctk cdi generate --output=/etc/cdi/nvidia.yaml --mode=csv
```

**Validation**:
```bash
# Verify CDI spec was generated
ls -la /etc/cdi/nvidia.yaml

# Test GPU access directly (nvidia-smi is not available on Jetson — use tegrastats)
sudo tegrastats --interval 1000
```
*(Press Ctrl-C after a few lines. You should see GPU/CPU utilization, memory usage, temperatures, and power draw.)*

**Reading `tegrastats` output**:
| Field      | Example              | Meaning                              |
|------------|----------------------|--------------------------------------|
| `RAM`      | `2457/7452MB`        | Used/Total system memory (shared)    |
| `GR3D_FREQ`| `0%`                | GPU utilization (0% when idle)       |
| `CPU`      | `[0%@1510,1%@1510,...]` | Per-core utilization @ frequency  |
| `VDD_GPU_SOC` | `2122mW/2122mW`  | GPU+SoC power (current/average)      |
| `VDD_CPU_CV` | `601mW/601mW`     | CPU+CV power (current/average)       |
| `tj`       | `38.5C`              | Junction (die) temperature           |

> [!NOTE]
> The `nvcr.io/nvidia/l4t-base:r36.4.0` container image does **not** exist on the NVIDIA registry for JetPack 6.2. Use `tegrastats` on the host to validate GPU access, then verify GPU availability in Kubernetes via the NVIDIA Device Plugin in Section 13.

---

### 10. Kernel Rebuild for Calico CNI

*DISCLAIMER*: A LOT of the next steps weren't built out by slowly compiling my steps with the help of an AI assistant but entire from the AI assistant, and adding, adjusting along the way.  I can't be certain these steps are correct and working!  Ensure to follow the backup procedures so you can recover.


*Why*: The stock L4T kernel (5.15.148-tegra) is deliberately minimal. It lacks the **XFRM framework** and several **netfilter modules** required by Calico CNI. Additionally, for systems booting from **NVMe**, the PCIe and NVMe drivers must be moved from modules to **built-in** to prevent boot failures.

In JetPack 6, you must build the main kernel, the NVIDIA Out-of-Tree (OOT) modules, and the Display drivers as a coordinated set.

> [!WARNING]
> This is a **full kernel Image + modules rebuild**. The entire process takes ~45–60 minutes natively on the Jetson.

#### Step A: Install Build Tools
```bash
sudo apt update
sudo apt install -y build-essential libncurses-dev bison flex \
    libssl-dev libelf-dev bc dwarves python3-pip
```

#### Step B: Download and Extract Sources
You need the full L4T public sources. Check your version with `cat /etc/nv_tegra_release` and download the corresponding archive from the [NVIDIA Jetson Linux Archive](https://developer.nvidia.com/embedded/jetson-linux-archive).

```bash
cd ~
mkdir -p Linux_for_Tegra/source && cd Linux_for_Tegra/source

# Example for L4T R36.4.3 (Adjust URL for your version)
wget https://developer.nvidia.com/downloads/embedded/l4t/r36_release_v4.3/sources/public_sources.tbz2
tar -xjf public_sources.tbz2
cd Linux_for_Tegra/source

# Extract the kernel AND the critical NVIDIA OOT/Display modules
tar -xjf kernel_src.tbz2
tar -xjf kernel_oot_modules_src.tbz2
tar -xjf nvidia_kernel_display_driver_source.tbz2
```

#### Step C: Set EXTRAVERSION (Critical)
```bash
cd ~/Linux_for_Tegra/source/kernel/kernel-jammy-src/
sed -i 's/^EXTRAVERSION =$/EXTRAVERSION = -tegra/' Makefile
```

#### Step D: Configure the Kernel
You must force the storage and networking drivers to be **built-in** (`=y`) rather than loadable modules.

```bash
# 1. Use the running config as base
zcat /proc/config.gz > .config

# 2. Enable K8s/Calico networking (XFRM must be built-in)
./scripts/config --enable CONFIG_XFRM
./scripts/config --enable CONFIG_XFRM_USER
./scripts/config --enable CONFIG_XFRM_ALGO
./scripts/config --module CONFIG_IP_SET
./scripts/config --module CONFIG_IP_SET_HASH_IP
./scripts/config --module CONFIG_IP_SET_HASH_NET
./scripts/config --module CONFIG_NETFILTER_XT_MATCH_NFACCT

# 3. Force NVMe and PCIe to be Built-In (REQUIRED for NVMe Boot)
./scripts/config --enable CONFIG_PCI
./scripts/config --enable CONFIG_PCIEPORTBUS
./scripts/config --enable CONFIG_PCIE_DW
./scripts/config --enable CONFIG_PCIE_DW_HOST
./scripts/config --enable CONFIG_PCIE_TEGRA194
./scripts/config --enable CONFIG_PHY_TEGRA194_P2U
./scripts/config --enable CONFIG_BLK_DEV_NVME

# 4. Enable Fan Control (REQUIRED for Orin Nano Super)
./scripts/config --enable CONFIG_PWM_TEGRA
./scripts/config --enable CONFIG_SENSORS_PWM_FAN
./scripts/config --enable CONFIG_TEGRA_BPMP_THERMAL

# 5. Resolve dependencies
make olddefconfig
```

**Validation**: Ensure the critical flags show `=y` in the text file:
```bash
grep -E "CONFIG_PCIE_TEGRA194=y|CONFIG_BLK_DEV_NVME=y|CONFIG_XFRM_USER=y" .config
```

#### Step E: Build the Kernel and All Modules
```bash
# 1. Build main Kernel Image (~15-20 mins)
make -j$(nproc) Image

# 2. Build In-Tree modules
make -j$(nproc) modules

# 3. Build NVIDIA Out-of-Tree (OOT) modules
cd ~/Linux_for_Tegra/source
make -j$(nproc) KERNEL_HEADERS=$PWD/kernel/kernel-jammy-src modules
```

#### Step F: Install to the System
```bash
# 1. Backup the working SSH-capable kernel
[ ! -f /boot/Image.stock ] && sudo cp /boot/Image /boot/Image.stock

# 2. Install the new Kernel Image
sudo cp ~/Linux_for_Tegra/source/kernel/kernel-jammy-src/arch/arm64/boot/Image /boot/Image

# 3. Install ALL modules (In-Tree + OOT)
cd ~/Linux_for_Tegra/source
sudo make KERNEL_HEADERS=$PWD/kernel/kernel-jammy-src modules_install
cd kernel/kernel-jammy-src
sudo make modules_install

# 4. Map the new modules
sudo depmod -a 5.15.148-tegra
```

#### Step G: Force Hardware Drivers into Initrd (Brick Prevention)
The Jetson Orin will "brick" (shuts down fan/lights immediately) if the `initrd` is missing the hardware initialization chain.

1.  **Edit the modules list**:
    ```bash
    sudo nano /etc/initramfs-tools/modules
    ```
2.  **Add these hardware drivers** to the end of the file:
    ```text
    nvme
    nvmap
    host1x
    nvgpu
    nvethernet
    nvidia
    tegra_bpmp
    ```

#### Step H: Regenerate the Initrd
```bash
sudo update-initramfs -c -k 5.15.148-tegra
sudo cp /boot/initrd.img-5.15.148-tegra /boot/initrd
```

**Validation**: Verify the "Big 3" hardware drivers are physically inside the boot file:
```bash
lsinitramfs /boot/initrd | grep -E "nvme.ko|nvmap.ko|host1x.ko|nvgpu.ko"
```

#### Step I: Configure Backup Boot Entry
Before rebooting, ensure you have a way back to the stock kernel.

```bash
# 1. Create a stock recovery folder
sudo mkdir -p /boot/stock
sudo cp /boot/Image.stock /boot/stock/Image
sudo cp /boot/initrd /boot/stock/initrd

# 2. Add the recovery entry to extlinux.conf
sudo nano /boot/extlinux/extlinux.conf
```
Add this entry:
```text
LABEL backup
        MENU LABEL backup kernel (STOCK)
        LINUX /boot/stock/Image
        INITRD /boot/stock/initrd
        APPEND ${cbootargs} root=/dev/nvme0n1p1 rw rootwait rootfstype=ext4 mminit_loglevel=4 console=ttyTCU0,115200 firmware_class.path=/etc/firmware fbcon=map:0 video=efifb:off console=tty0
```

#### Step J: Reboot and Verify
```bash
sudo reboot
```

**Post-boot verification**:
```bash
# Check Builder Name
uname -v  # Should show your username and Mar 1 2026 or later

# Check Fan
for dev in /sys/class/thermal/cooling_device*; do echo "$dev: $(cat $dev/type)"; done
# Should see 'pwm-fan'

# Check Calico Modules
for mod in ip_set ip_set_hash_ip xt_nfacct; do
    sudo modprobe $mod && echo "$mod: OK" || echo "$mod: FAIL"
done
```

#### Step K: Protecting the Custom Build (Critical)
To prevent `apt upgrade` from overwriting your custom kernel binary and "bricking" the NVMe boot, you must "hold" the critical packages.

```bash
sudo apt-mark hold \
    nvidia-l4t-kernel \
    nvidia-l4t-kernel-headers \
    nvidia-l4t-kernel-dtbs \
    nvidia-l4t-kernel-oot-modules \
    nvidia-l4t-display-kernel \
    nvidia-l4t-initrd \
    nvidia-l4t-bootloader \
    kubeadm kubectl kubelet
```

**Validation**:
```bash
apt-mark showhold
```

---

### 11. Install Kubernetes Tools

**Install prerequisites**
```bash
sudo apt update
sudo apt-get install -y apt-transport-https ca-certificates curl gpg
```

**Add the Kubernetes APT Repo (v1.33)**
```bash
# Create keyring directory
sudo mkdir -p -m 755 /etc/apt/keyrings

# Download the Kubernetes GPG key for v1.33
sudo curl -fsSL https://pkgs.k8s.io/core:/stable:/v1.33/deb/Release.key | sudo gpg --dearmor -o /etc/apt/keyrings/kubernetes-apt-keyring.gpg

# Add the Kubernetes APT repository for v1.33
echo 'deb [signed-by=/etc/apt/keyrings/kubernetes-apt-keyring.gpg] https://pkgs.k8s.io/core:/stable:/v1.33/deb/ /' | sudo tee /etc/apt/sources.list.d/kubernetes.list

# Update package list
sudo apt-get update
```

**Check available versions** (should match the version running on your Pi cluster):
```bash
apt-cache madison kubelet
apt-cache madison kubeadm
```

**Install and hold packages**
```bash
KUBE_VERSION="1.33.2-1.1"

sudo apt-get install -y kubelet=$KUBE_VERSION kubeadm=$KUBE_VERSION kubectl=$KUBE_VERSION
sudo apt-mark hold kubelet kubeadm kubectl
```

> [!IMPORTANT]
> The `KUBE_VERSION` must match the version running on your control plane and existing worker nodes. Check with `kubectl version` on the control plane.

**Fix CNI Path** (same issue as on the Pi cluster)
*Why*: The CNI plugins may be installed in `/usr/lib/cni`, but kubelet looks in `/opt/cni/bin`.

```bash
sudo mkdir -p /usr/lib/cni
sudo ln -s /opt/cni/bin/* /usr/lib/cni/
```

---

### 12. Join the Cluster

#### Step A: Get the Join Command (on the Control Plane)

SSH into your Pi control plane node and run:
```bash
kubeadm token create --print-join-command
```

This will output something like:
```
kubeadm join :6443 --token  --discovery-token-ca-cert-hash sha256:
```

> [!WARNING]
> `kubeadm` tokens expire after **24 hours**. If you're like me and kept the previous "kubeadm join" command and you've been working on the kernel rebuild (Section 10) and more than a day has passed, generate a **new** token before attempting to join.

#### Step B: Join (on the Jetson)

Run the full join command on the Jetson, specifying the containerd CRI socket:
```bash
sudo kubeadm join :6443 \
    --token  \
    --discovery-token-ca-cert-hash sha256: \
    --cri-socket=unix:///run/containerd/containerd.sock
```

> [!NOTE]
> If a previous join attempt failed (expired token, swap still enabled, etc.), you must **reset** before retrying:
> ```bash
> sudo kubeadm reset --cri-socket=unix:///run/containerd/containerd.sock
> ```
> Then generate a fresh token on the control plane and re-run the join command.

**Validation** (on the Control Plane):
```bash
kubectl get nodes
```
You should see the Jetson node listed. It may show `NotReady` for a minute or two while Calico networking initializes, then change to `Ready`.

#### Step C: Label the Node

*Why*: Labels let you schedule GPU workloads specifically to the Jetson node using `nodeSelector` or `nodeAffinity` in your pod specs.

On the **Control Plane**:
```bash
# Label as a GPU node (used by NVIDIA Device Plugin nodeSelector)
kubectl label node pik8snodenvidia1 nvidia.com/gpu.present=true

# Label for accelerator-aware scheduling (used by Ollama and other GPU workloads)
kubectl label node pik8snodenvidia1 accelerator.present=true

# Label the node role
kubectl label node pik8snodenvidia1 node-role.kubernetes.io/worker=worker

# Optional: label the hardware type
kubectl label node pik8snodenvidia1 hardware=jetson-orin-nano
```

**Validation**:
```bash
kubectl get nodes --show-labels
```

#### Step D: Node Exclusivity (Taints)
To ensure the Jetson's limited 8GB RAM is reserved strictly for GPU-accelerated workloads (like Ollama) and isn't consumed by random cluster pods, apply a Taint.

On the **Control Plane**:
```bash
kubectl taint nodes pik8snodenvidia1 dedicated=gpu:NoSchedule
```

**Validation**:
```bash
kubectl describe node pik8snodenvidia1 | grep Taints
```

---

### 13. NVIDIA Device Plugin for Kubernetes (Control Plane)

*Why*: The NVIDIA Device Plugin exposes the Jetson's GPU as a schedulable resource (`nvidia.com/gpu`) in Kubernetes. Without it, pods cannot request GPU access through the standard Kubernetes resource model.

#### Step A: Create a RuntimeClass

On the **Control Plane**, apply this manifest:
```bash
cat < [!IMPORTANT]
> You **must** use `--set-string` (not `--set`) for the `nodeSelector` value. With `--set`, Helm interprets `"true"` as a boolean `true`, which causes a type error: `nodeSelector values must be strings`. The `--set-string` flag forces string type.

> [!NOTE]
> If a previous `helm install` failed and left an orphaned release, you'll get `Error: cannot re-use a name that is still in use`. Fix with:
> ```bash
> helm uninstall nvidia-device-plugin -n nvidia-device-plugin
> ```
> Then re-run the install command above.

**Validation**:
```bash
# Check the device plugin pod is running on the Jetson node
kubectl get pods -n nvidia-device-plugin -o wide

# Verify the GPU is advertised as a schedulable resource
kubectl describe node pik8snodenvidia1 | grep nvidia.com/gpu
```
You should see `nvidia.com/gpu: 1` under `Capacity` and `Allocatable`.

---

### 14. Verify GPU Workloads

Deploy a test pod to confirm end-to-end GPU access:

```bash
cat </dev/null && echo 'CUDA devices:' && ls /dev/cuda* 2>/dev/null && echo 'Test complete' && sleep 10"]
    resources:
        limits:
        nvidia.com/gpu: 1
EOF

cat < [!NOTE]
> We use `ubuntu:22.04` instead of `nvcr.io/nvidia/l4t-base:r36.4.0` because the l4t-base image for JetPack 6.2 is not published on the NVIDIA container registry. The NVIDIA Device Plugin + CDI handles exposing the GPU devices to the container regardless of the base image.

**Validation**:
```bash
# Wait for the pod to complete
kubectl get pod gpu-test -w

# Check logs
kubectl logs gpu-test
```
You should see NVIDIA device files listed (`/dev/nvhost-*`, `/dev/nvmap`, etc.), confirming the GPU is accessible from within the container.

Clean up:
```bash
kubectl delete pod gpu-test
```

---

## Troubleshooting

### Kernel Rebuild: The "Brick" State (No fan, No Ethernet lights)
If the Jetson shuts down 5 seconds after power-on (fan stops, LEDs go dark), it has likely triggered a hardware watchdog reset or a kernel panic.
- **Cause 1: Missing PCIe/NVMe Built-ins**. If you boot from NVMe, the PCIe and NVMe drivers MUST be `=y` in the kernel config. If they are modules, the kernel cannot "see" the drive to load its own modules, and panics.
- **Cause 2: Broken Initrd Dependency Chain**. On Orin, the boot process requires `nvmap.ko`, `host1x.ko`, and `nvgpu.ko` to be present in the `initrd`. If they are missing, the GPU fails to initialize, causing a watchdog trip.
- **Cause 3: Version Mismatch**. If `strings /boot/Image` and `modinfo nvgpu.ko` show different version strings (e.g. `5.15.148` vs `5.15.148-tegra`), the kernel will reject the drivers and panic.

### Fan not spinning
- The fan is temperature-controlled. It only spins when the chip reaches ~40-50°C.
- **Test it manually**: `sudo sh -c 'echo 10 > /sys/class/thermal/cooling_device0/cur_state'` (if cooling_device0 is `pwm-fan`).
- **If missing**: If `pwm-fan` is missing from the cooling device list, ensure `CONFIG_SENSORS_PWM_FAN=y` and `CONFIG_TEGRA_BPMP_THERMAL=y` were set in the kernel build.

### Calico CNI: `failed to create host netlink handle: protocol not supported`
- This is caused by **missing XFRM kernel support**. The stock L4T kernel has `CONFIG_XFRM` completely absent.
- A full kernel rebuild is required with `CONFIG_XFRM_USER=y`.

### USB-C serial console not showing up on Mac
- Ensure the USB-C cable supports data (some cables are power-only).
- Try a different USB-C port on your Mac.
- Check `ls /dev/tty.usbmodem*` — if nothing appears, the Jetson may still be booting. Wait 60 seconds and check again.
- Make sure **nothing is connected to the DisplayPort output** — if a display is detected, oem-config redirects to the GUI and disables serial output.

### Cannot SSH after `apt full-upgrade` reboot
- After a large upgrade (especially the first one post-install), the Jetson can take **3–5 minutes** to come back on a microSD card. Don't panic — wait it out.

### Jetson won't boot after NVMe migration
- Ensure the microSD card was **removed** — if present, the UEFI bootloader will try the SD card first.
- Verify the NVMe SSD is properly seated in the M.2 2230 slot.
- Re-insert the microSD card, boot from it, and verify the migration was successful by checking `/boot/extlinux/extlinux.conf` points to `nvme0n1p1`.

### Cannot SSH after first boot
- Confirm the Ethernet cable is connected to the same network as your Pi cluster.
- Check your router's DHCP lease table for the Jetson's IP address.
- If you haven't completed the OEM configuration yet, SSH won't be available — complete it via the USB-C serial console first (Section 3).

### `nvcc: command not found`
- CUDA is installed by JetPack but `/usr/local/cuda/bin` is not in PATH by default.
- Add to your shell profile: `export PATH=/usr/local/cuda/bin:$PATH` (see Section 4, Step C).

### `pip3: command not found`
- Not installed by default on JetPack 6. Install with: `sudo apt install -y python3-pip`.

### oh-my-zsh plugin errors (`plugin 'zsh-autosuggestions' not found`)
- You must `git clone` the plugin repositories before referencing them in `~/.zshrc`. See Section 4, Step E.

### Swap keeps re-appearing after reboot
- L4T has a `nvzramconfig` service that creates zram swap devices (6 per CPU core) on every boot.
- Disable it: `sudo systemctl disable nvzramconfig.service`
- Verify: `free -m` should show `Swap: 0 0 0`.

### Helm install: `nodeSelector values must be strings`
- Use `--set-string` instead of `--set` for nodeSelector values. Helm interprets `"true"` as a boolean with `--set`.

### GPU not visible in Kubernetes
- Verify the CDI spec exists: `ls /etc/cdi/nvidia.yaml`.
- Verify the NVIDIA device plugin pod is running: `kubectl get pods -n nvidia-device-plugin`.
- Re-generate the CDI spec: `sudo nvidia-ctk cdi generate --output=/etc/cdi/nvidia.yaml --mode=csv`.

### Kernel rebuild: boot failure recovery (microSD)
1. **Insert the microSD card** into the Jetson's microSD slot.
2. **Power on** — the UEFI should boot from the microSD card.
3. **Identify the NVMe partition and mount it**:
    ```bash
    sudo mkdir -p /mnt/nvme
    sudo mount /dev/nvme0n1p1 /mnt/nvme
    ```
4. **Restore the working kernel**:
    ```bash
    sudo cp /mnt/nvme/boot/stock/Image /mnt/nvme/boot/Image
    sudo cp /mnt/nvme/boot/stock/initrd /mnt/nvme/boot/initrd
    # Restore stock modules
    sudo rm -rf /mnt/nvme/lib/modules/5.15.148-tegra/*
    sudo cp -a /lib/modules/5.15.148-tegra/. /mnt/nvme/lib/modules/5.15.148-tegra/
    ```
5. **Power off, remove the microSD card**, then power on. The Jetson will boot from NVMe with the original kernel.

### Thermal throttling under load
- Run `jtop` to monitor temperatures and clock frequencies.
- Force maximum fan speed: `sudo jetson_clocks --fan`.

---

## References

-   [NVIDIA Jetson Orin Nano Super Developer Kit](https://www.nvidia.com/en-us/autonomous-machines/embedded-systems/jetson-orin/nano-super-developer-kit/)
-   [Jetson Orin Nano Developer Kit User Guide](https://developer.nvidia.com/embedded/learn/jetson-orin-nano-devkit-user-guide/index.html)
-   [JetPack SDK](https://developer.nvidia.com/embedded/jetpack)
-   [NVIDIA Container Toolkit Documentation](https://docs.nvidia.com/datacenter/cloud-native/container-toolkit/latest/index.html)
-   [NVIDIA Device Plugin for Kubernetes](https://github.com/NVIDIA/k8s-device-plugin)
-   [JetsonHacks — Migrate to SSD](https://github.com/jetsonhacks/migrate-jetson-to-ssd)
-   [Jetson Linux Archive (L4T Sources)](https://developer.nvidia.com/embedded/jetson-linux-archive)
-   [jetson-stats (jtop)](https://github.com/rbonghi/jetson_stats)
-   [Pi K8s Cluster Setup Guide](../pi-k8s-cluster/)
-   [Build Jetson Orin Kernel & Modules Now - YouTube](https://youtu.be/7P6I2jeJNYo?si=6tvgl9eBwdqGYJwa)
-   [Successful kernel tweaks to support Kubernetes and Calico on the Jetson Orin Nano](https://forums.developer.nvidia.com/t/successful-kernel-tweaks-to-support-kubernetes-and-calico-on-the-jetson-orin-nan/358833)
AI Usage Disclosure
This document was created with assistance from AI tools. The content has been reviewed and edited by a human. For more information on the extent and nature of AI usage, please contact the author.